teamcity {
    environments {
        name {
            version = '9.0'
            downloadUrl = `${baseDownloadUrl}/TeamCity-${version}.tar.gz`
            homeDir = `${baseHomeDir}/TeamCity-${version}`
            dataDir = `${baseDataDir}/${version}`
            javaHome = file('/path/to/java')
            serverOptions = '-Dteamcity.development.mode=true -Dteamcity.development.shadowCopyClasses=true'
            agentOptions = ''
        }
    }
}Using the Gradle TeamCity plugin - Part 2
30 December 2016
Tags: gradle teamcity build plugin
This post is the second of two on using the Gradle TeamCity plugin and will cover how to setup multiple TeamCity environments to test and debug a plugin.
First we will look at configuring environments, all the properties and tasks that are available and some tips on setting up a project to develop a TeamCity plugin.
Environments
Environments are configured in the environments configuration block under the teamcity configuration.
The environments configuration allows one or more TeamCity installations to be defined so that
the plugin being developed can be deployed and tested.
Environment properties
An environment is given a name and each environment has the properties shown in the following example:
The version property is the released version of TeamCity that is used by the environment. The property is used
as part of the URL to download TeamCity and as part of the directory where TeamCity is installed.
The downloadUrl property is the URL of a TeamCity release that is downloaded. The default is to download the
release archives from the JetBrains download site.
The homeDir property is the path to the TeamCity installation.
The dataDir property is the path to the TeamCity Data Directory where the TeamCity
configuration is stored.
The javaHome property is the path to the version of Java to use to run the TeamCity Server and Build Agent. If the
property is not set the version of Java running Gradle is used.
The serverOptions property is a collection of options that are passed to the TeamCity Server at startup.
The agentOptions property is a collection of options that are passed to the TeamCity Build Agent at startup.
The example above shows all the properties with their default values, so the minimum required to create an environment
is a name, and in that case it would use TeamCity version 9.0. The minimum required for an environment using a
different version is to set the version and possibly the javaHome properties.
Example environment using TeamCity 10.0.4 and Java 8
teamcity {
    environments {
        teamcity10 {
            version = '10.0.4'
            javaHome = file('/path/to/java8')
        }
    }
}
Shared environment properties
The downloadUrl, homeDir and dataDir properties for all environments are based on shared environment properties
to allow installations and data directories to share a common parent directory. The shared properties and their
default values are shown in the following example.
teamcity {
    environments {
        downloadsDir = 'downloads'
        baseDownloadUrl = 'http://download.jetbrains.com/teamcity'
        baseDataDir = 'data'
        baseHomeDir = 'servers'
    }
}
The downloadsDir property is the directory used to store the downloaded TeamCity archives. By default this
directory is under the project, but I would recommend changing this to store the files in another directory.
The baseDownloadUrl property is used to create the URL to download the TeamCity archive. The default is to use the
JetBrains download site, but it can be changed to use an alternative server, possibly a local enterprise server that
mirrors the JetBrains site.
The baseHomeDir property is the directory that the TeamCity release for each environment is installed. Instead of
the archive being unpacked to a 'TeamCity' directory the version is appended as shown earlier. I recommend changing
this to use a directory that can be shared by multiple projects.
The baseDataDir property is the base directory used to store all the TeamCity configuration files for each
environment. Each environment’s configuration files are stored in a sub-directory based on the TeamCity version, but
only the major and minor version numbers are used. I recommend keeping this directory within the project, any build
configurations will most likely be setup to test the TeamCity plugin and possibly not useful elsewhere.
Environment tasks
A set of tasks are created for each environment. These tasks support downloading and installing a TeamCity Server, starting and stopping both the server and build agent. There are also tasks to deploy and undeploy the plugin to each environment.
The following lists the task name and description:-
-
downloadName - downloads the TeamCity archive
-
installName - unpacks and installs TeamCity
-
deployPluginToName - deploy plugin to an environment
-
undeployPluginFromName - the plugin from an environment
-
startNameServer - starts the server for an environment
-
stopNameServer - stops the server for an environment
-
startNameAgent - starts the default agent for an environment
-
stopNameAgent - stops the default agent for an environment
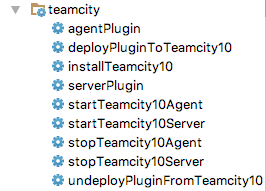
The tasks for each environment are grouped by Gradle under 'TeamCity tasks'. The following image shows the tasks for the 'teamcity10' environment in IntelliJ IDEA’s Gradle Tool window.
Examples
The following example shows configuring shared environment properties using Gradle extension properties. The extension
properties are themselves configured using Gradle properties. Gradle properties can be defined in a gradle.properties
file in the project root or in the .gradle directory of the user’s home directory. Additionally Gradle properties
can be set from the command line using the -P option.
The example below shows that the directory to download and store the TeamCity release archives can be overridden with
the Gradle downloads.dir property that is then used to set the shared environments property downloadsDir. Likewise
the servers.dir property is used to set baseHomeDir environments property.
ext {
    downloadsDir = project.findProperty('downloads.dir') ?: "$rootDir/downloads"
    serversDir = project.findProperty('servers.dir') ?: "$rootDir/servers"
    java7Home = project.findProperty('java7.home') ?: '/opt/jdk1.7.0_80'
    java8Home = project.findProperty('java8.home') ?: '/opt/jdk1.8.0_92'
}

teamcity {
    ...

    environments {
        downloadsDir = project.downloadsDir
        baseHomeDir = project.serversDir
        baseDataDir = 'data'

        teamcity9 {
            version = '9.1.7'
            javaHome = file(java7Home)
        }

        teamcity10 {
            version = '10.0.4'
            javaHome = file(java8Home)
        }
    }
}
This next example shows using a Groovy closure to create a string with the Java debug options with a different port for each Java process.
def debugOptions = { port -> "-agentlib:jdwp=transport=dt_socket,server=y,suspend=n,address=${port}" }

teamcity {
    environments {
        teamcity9 {
            version = '9.1.7'
            javaHome = file(java7Home)
            serverOptions debugOptions(5005)
            agentOptions debugOptions(5006)
        }
    }
}
Using environment tasks
In this next section we use the tasks available in each environment to deploy the plugin, start and stop both the TeamCity Server and Build Agent.
Deploying the plugin
The following steps use the agent-server-plugin from the samples directory. The plugin is a simple example of a Build Feature plugin that has both agent-side and server-side components.
If the TeamCity Server for the environment is not already installed the following task can be executed to download and install the TeamCity Server. This task can take several minutes to complete.
$ ./gradlew installTeamcity10
We can now start the TeamCity Server by executing the following task.
$ ./gradlew startTeamcity10Server
The output from the task shows that starting the server will also deploy the plugin.
:build UP-TO-DATE
:deployPluginToTeamcity10
:startTeamcity10Server

BUILD SUCCESSFUL
The first time the server is started some setup is required, accepting the license, selecting the database and creating an administration user.
To see the deployed plugin navigate to the Plugins List in the TeamCity Administration page. The external plugins should show the plugin as shown in the following image

The plugin can be deployed or re-deployed with or with-out the server running by executing the deploy task, as shown.
$ ./gradlew deployPluginToTeamcity10
Finally to start the TeamCity Build Agent the following task can be run.
$ ./gradlew startTeamcity10Agent
After the TeamCity Build Agent has finished its startup procedures it will appear in the Agents list.
Making a change to a web resource and re-deploying the plugin
We can make a change to a web resource file, for example changing the file
src/main/resources/buildServerResources/example.jsp and then re-deploy the plugin without re-starting the server.
$ ./gradlew deployPluginToTeamcity10
...
:check UP-TO-DATE
:build
:deployPluginToTeamcity10

BUILD SUCCESSFUL

Total time: 7.467 secs
Refreshing the example page should show the change.
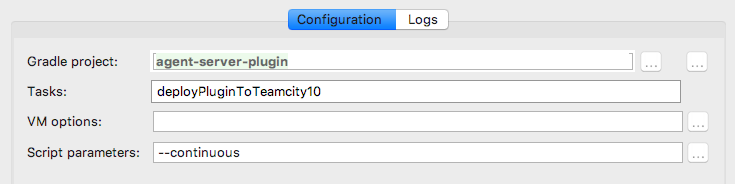
It takes quite a few seconds for Gradle to configure and execute the tasks required to re-package and re-deploy the plugin. Gradle supports a continuous option that keeps Gradle running and monitoring the project for any changes. We can run the deploy task with the continuous option.
$ ./gradlew --continuous deployPluginToTeamcity10
Continuous build is an incubating feature.
...
:build UP-TO-DATE
:deployPluginToTeamcity10 UP-TO-DATE

BUILD SUCCESSFUL

Total time: 6.836 secs

Waiting for changes to input files of tasks... (ctrl-d to exit)
Running the task with the continuous option takes about the same amount of time as the previous deploy but when the resource file is changed again, as shown below, it is much quicker to re-deploy.
Waiting for changes to input files of tasks... (ctrl-d to exit)
modified: .../agent-server-plugin/src/main/resources/buildServerResources/example.jsp
Change detected, executing build...

...
:check UP-TO-DATE
:build
:deployPluginToTeamcity10

BUILD SUCCESSFUL

Total time: 1.648 secs

Waiting for changes to input files of tasks... (ctrl-d to exit)
To run the build continuously from within IDEA requires editing a Run/Debug Configuration and providing the '--continuous' option to a configuration the executes a 'deploy' task, as shown in the following image:
Making a change to a class
We can make a change to a class but there are some restrictions. The TeamCity documentation, Development Environment, covers what can and can’t be done when changing a class. To summarise, using a debug connection, only method bodies can be changed and updated using the JVM’s HotSwap feature.
Debugging the plugin
In this section we will go through the steps to setup both the TeamCity Server and Build Agent in debug mode and connect a remote debugger to them using IntelliJ IDEA.
To debug the TeamCity Server and Build Agent requires enabling the debug options for each Java process. The following example shows and environment with debug options for both the server and agent. Note each uses a different port, this is required if both are to be debugged at the same time.
teamcity {
    environments {
        teamcity10 {
            version = '10.0.4'
            javaHome = file(java8Home)
            serverOptions '-agentlib:jdwp=transport=dt_socket,server=y,suspend=n,address=5005'
            agentOptions '-agentlib:jdwp=transport=dt_socket,server=y,suspend=n,address=5006'
        }
    }
}
Create a Remote Run/Debug Configuration for both the server and the agent, as shown below, the port for each should match the configuration shown above.

We should then have two Remote Debug configurations as shown below.

Start both the server and agent using the Gradle tasks, 'startTeamcity10Server' and 'startTeamcity10Agent', either from the command line or using the Gradle Tool Window in IDEA.
We will need a project and a build configuration to test debugging the plugin. Once the server is started create a project and then a build configuration. The build configuration doesn’t require a VCS root or a build file, a command line build step using an inline script will do.
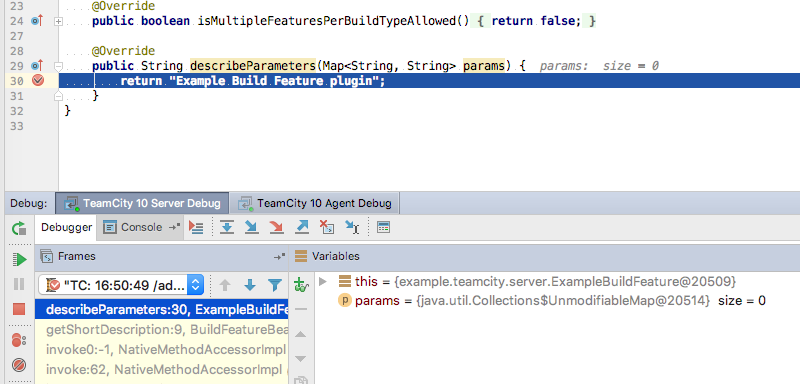
Start the Remote debug connection for the server. Open the 'ExampleBuildFeature' class in the main project and set a breakpoint in the 'describeParameters' method. Using the TeamCity UI edit the build configuration and add the 'Example Build Feature', the remote debug connection should stop at the breakpoint in the plugin source.
The same can be done for agent-side plugin code, start the Remote debug connection for the agent. Open the 'ExampleBuildFeature' class in the agent sub-project and set a breakpoint in the 'buildStarted' method. Run the build configuration, the remote debug connection for the agent should stop at the breakpoint in the agent-side plugin source.
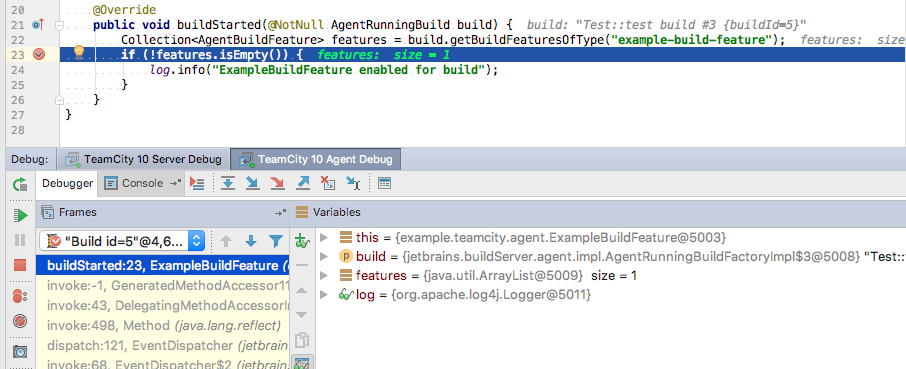
Be aware that the Agent debug connection can become disconnected if the agent preforms an upgrade. This can happen if the agent-side code is changed and the plugin re-deployed.
This post has hopefully provided some help on testing and debugging TeamCity plugins using the Gradle TeamCity plugin.