buildscript {
    repositories {
        mavenCentral()
        maven {
            url "https://plugins.gradle.org/m2/"
        }
    }
    dependencies {
        classpath 'org.jetbrains.kotlin:kotlin-gradle-plugin:1.0.3'
        classpath 'com.github.rodm:gradle-teamcity-plugin:0.11'
    }
}

apply plugin: 'kotlin'Blog
More on TeamCity's Kotlin DSL
12 April 2017
Tags: teamcity configuration kotlin dsl gradle
Introduction
This post is a continuation of my experiments using TeamCity’s Kotlin DSL that I started in my previous post.
In this post I cover adding multiple build configurations to a project and explore the different ways that can be achieved, from simple copy and paste to using base build types and build templates. Then I cover adding build features and build failure conditions to the build configurations.
The last few sections cover triggering a build when the settings change, the Maven plugin and a Gradle plugin. The Maven plugin has a generate goal that provides some checking and reporting of any problems in the DSL. The Gradle plugin is a plugin that I’ve developed that provides similar functionality to the Maven plugin.
Documentation
When I started my experiments I hadn’t read the documentation only the series of posts on the TeamCity blog.
The first page in the documentation Storing Project Settings in Version Control covers the setup of using versioned settings and synchronizing the settings with a VCS. It also covers the implications of storing secure data such as passwords. The section on Displaying Changes covers triggering builds on settings changes that I discuss later.
The Kotlin DSL page covers the advantages of using the Kotlin DSL, how to download the current settings in a Kotlin format, working with the Kotlin DSL and setting up an IDE. It then covers making changes to the settings and applying those changes to a TeamCity server.
The Upgrading DSL page covers the changes that have been made to the DSL between the 10.0 version and the next release 2017.1. There are quite a number of changes, possibly a sign that the DSL is still being developed.
The first two pages are useful for setting up a server to use versioned settings in the Kotlin format and setting up an IDE to make changes but there is no DSL reference so not something that will be referred to a lot.
On the Kotlin DSL page there is a claim that it makes discovery of the available API options much simpler. It is easy to find methods and fields but it is not easy to map a field to the equivalent field in the UI.
The documentation explains the purpose of the identifiers and the effect of changing a uuid on build configurations
and projects but it doesn’t explain why extId and uuid are required and can’t be derived from the name.
There is a section that recommends setting up unit tests for testing the DSL, but no example is provided, however
there is an example in the last post of the blog series mentioned earlier.
There is a recommendation to put the project settings in a separate VCS repository, I’ve used Travis CI and AppVeyor and like the idea of keeping the settings with the code. There are good reasons to use a separate repository if passwords or other secure data maybe contained in the settings. One downside to this is having to tag and branch the repositories together if you ever need to rebuild an older version.
Kotlin Gradle plugin
When I was writing the previous post I realised I was using the Java plugin, so I changed the build to use the Kotlin plugin.
What this changed was that the Project.kt file would be compiled by the plugin so it provided some compile time
checking that the code was valid but the settings.kts file was not compiled. This was a small
improvement over the 'java' plugin that didn’t compile either of the files.
Using the Maven plugin does compile the settings.kts file but only if there is also a file with a kt extension
in the package.
There is a bit more to the Maven plugin that I discuss later.
Multiple build configurations
Before adding more build configurations I wanted to see if all the settings, project, build type and version control
could be stored in the settings.kts file rather than spread out over many files. This does work but it means
that neither the java plugin or the kotlin plugin will compile the file.
To fully build and test the Gradle TeamCity plugin, the project used to test the TeamCity Kotlin DSL, it is
built and tested using Java 7 and Java 8, there are also 2 build configurations that run functional tests again using
Java 7 and Java 8, then there is a build configuration to run the builds in the samples directory.
Finally there is a code quality build configuration that runs the sonarqube task.
The list of build configurations is as follows:-
-
Build - Java 7
-
Build - Java 8
-
Functional Test - Java 7
-
Functional Test - Java 8
-
Report - Code Quality
-
Samples Test - Java 7
The differences between the build configurations can be achieved by setting the Gradle tasks and the Java home
parameters, except for the Code Quality build, this requires an additional property gradle.opts that is used
to provide the host URL for the SonarQube server.
The next few sections discuss the different ways I’ve tried using the Kotlin DSL to create the above build configurations.
Copy & Paste build types
The first approach I took was just to copy and paste the code that creates a build type and modify it for each of the
build configurations listed above. Each build type required a new value for the name, extId and uuid properties.
For the different uuid values I copied the existing build’s value and changed the last character.
For builds running unit tests the gradle.tasks parameter was set to clean build for functional tests it was set
to clean functionalTest, for the samples test it was set to clean samplesTest and for the code quality build it
was set to clean build sonarqube.
For builds using Java 7 the java.home parameter was set to %java7.home% and for Java 8 it was set to %java8.home%.
Here’s a link to the code settings.kts with the repeated block highlighted.
Replace duplicated code with functions
The next approach was to refactor the common code into functions. I created two functions createBuildType and
configureBuildType. The first function creates a build type with the name, extId and uuid properties set,
the second function uses Kotlin’s apply function to configure each built type with a VCS root, a Gradle build step,
a VCS trigger and the Gradle tasks and Java home parameters. This reduced the settings.kts file by about 70 lines.
The code can be seen at the following links, build type, createBuildType and configureBuildType
Base build types
While writing the above code I noticed that the constructor for BuiltType takes an optional parameter, base, that
is another BuildType. The comment for the constructor indicates that if base is not null the settings are copied
from it to the new BuildType. So this provides another way of creating build configurations using shared code.
The code for the base type can be seen here, base build type, and the creation of a build type using it can be seen here, build type. Additionally parts of the configuration can be overridden within the lambda, as seen here, build type with overrides, the timeout is changed and the parameters have different values set.
I’ve not tried it but it should be possible to construct a base build type based on another base build type, possibly reducing further the amount of code required to create multiple build configurations.
The code for base build types seems to create more readable code, some of the lines in the previous example were too long.
Build template
Using a build template is similar to the base BuildType discussed in the previous section, a Template is created
with the settings for a build configuration, then one or more BuildType s are created using the template. One
noticeable difference in the code, when exporting a template from TeamCity, is that there are more id s, build steps,
VCS triggers, and build features all have an id. This is to allow build configurations to override settings using
the id to refer to the configuration in the template. I’ve found that the id s can be removed, without causing a
problem, if they are not used to provide any additional configuration to a BuildType.
The following link shows the build template and this link shows a build type using it
There is little to choose between using base build types and build templates when looking at the Kotlin DSL but there is a difference with the XML files created by both. The base build type creates XML files that contain all the configuration for the build type where as the build type using a template contains essentially only the differences from the template, name, external id, uuid and any overrides.
Build configuration
The next sections will cover some of the parts of a build configuration or build template, to add build features, failure conditions and a build trigger when the settings change.
Build features
The first feature I added to the build configuration was to use the Performance Monitor during a build, this feature is possibly one of the simplest to add, it has no configuration and the following code enables it.
    feature {
        id = "perfmon"
        type = "perfmon"
    }
The next feature I tried was more complex, a shared resource, it is configured at the project level and for each build configuration that uses it. In my example a 'Resource with quota' called 'BuildLimit' is created with a quota of '2', this will limit the number of concurrent builds using the resource to 2.
The following code shows how a shared resource is configured for a project.
Project level feature configuration
project {
    features {
        feature {
            id = "PROJECT_EXT_2"
            type = "JetBrains.SharedResources"
            param("name", "BuildLimit")
            param("type", "quoted")
            param("quota", "2")
        }
    }
}
The following code shows how a build configuration uses a shared resource
Build type feature configuration
    features {
        feature {
            id = "BUILD_EXT_2"
            type = "JetBrains.SharedResources"
            param("locks-param", "BuildLimit readLock")
        }
    }
All the configuration and usage of a resource is done using strings, there are no hints on what the names or values could be, the only way is to configure a build and to export it. The XML Reporting plugin has the same problem there are many reports supported and each has different configuration parameters that can only be found by configuring a build using the UI and exporting it.
While id s are not necessary they are useful to override a configuration in a template. For example to disable
a feature the enabled property can be set to false with the id of the feature.
    features {
        feature {
            id = "BUILD_EXT_2"
            enabled = false
        }
    }
A more convenient method is available, the function disableSettings can be called with a variable list of ids
of the features to be disabled.
    features {
        disableSettings("perfmon", "BUILD_EXT_2")
    }
While not a build a feature I noticed that re-ordering build steps requires creating an ArrayList with the ids
of the build steps in the order that they are to be executed. There is no equivalent method to disableSettings
for the build steps order, so the API is inconsistent.
    steps {
        ....
        stepsOrder = arrayListOf("RUNNER_2", "RUNNER_1", "RUNNER_3")
    }
Failure conditions
The only failure condition setting I typically make on a build configuration is to set a build timeout, and in this example I set it to 10 minutes. I’ve included all the properties that are available in the code below with their default values. These were easy to discover within my IDE.
    failureConditions {
        executionTimeoutMin = 10
        nonZeroExitCode = true
        testFailure = true
        errorMessage = false
        javaCrash = true
    }
While the above settings are easy to discover and set, additional failure conditions based on metrics or build log messages are harder to configure using the API alone. Again setting up a build configuration with the failure condition and then exporting the project from TeamCity in Kotlin format is the best option.
The example below shows a failure condition on a metric change, the enumerations for the various fields looks ugly, it would be cleaner if the values could be specified without the enclosing classes. It is also not easy to know which properties are required and which are optional.
    failOnMetricChange {
        metric = BuildFailureOnMetric.MetricType.ARTIFACT_SIZE
        units = BuildFailureOnMetric.MetricUnit.DEFAULT_UNIT
        comparison = BuildFailureOnMetric.MetricComparison.MORE
        compareTo = build {
            buildRule = lastPinned()
        }
    }
Triggering a build when settings change
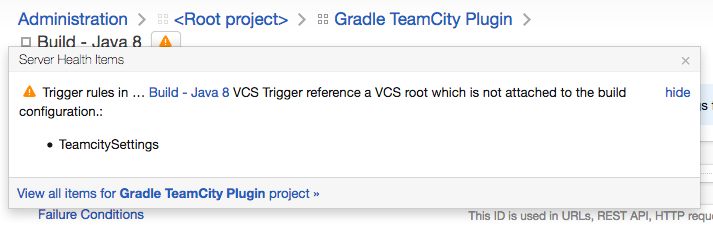
On the Versioned Settings page there is a Change Log view that shows the changes made to the settings, it only
shows changes made under the .teamcity directory. I wanted changes to the settings to trigger a build, it’s
possible a build failure is due to a configuration change.
Following the documentation
I added the following to the VCS trigger.
    triggers {
         vcs {
            triggerRules = "+:root=Settings_root_id;:*"
         }
     }
This didn’t cause builds to trigger due to a settings change, so I changed the VCS root name to, TeamcitySettings
this also didn’t trigger any builds. After adding the VCS root to the build configuration and then reading the
documentation about trigger rules I eventually found that the following worked.
    triggers {
        vcs {
            triggerRules = """
                +:root=TeamcitySettings;:**
                +:root=GradleTeamcityPlugin:**
            """.trimIndent()
        }
    }
The key was changing the file path wildcard pattern from '*' to '**', also both the VCS roots for the settings and the project have to be included otherwise only changes to one VCS root will trigger a build.
I mentioned above that I added the settings VCS root to the build configuration, I had to revert that change, the settings VCS root resulted in the project code being checked out then removed for the settings checkout. So the build configuration has only the VCS root for the project and not the settings VCS root, this works despite the reference in the trigger rules. Although this causes TeamCity to show a warning in the UI about an un-attached VCS root.
Maven Plugin
When I initially converted the Maven POM file to a Gradle equivalent I missed the Maven plugin,
teamcity-configs-maven-plugin.
The plugin only gets a brief mention in the
documentation
about using it to scramble passwords for updating an existing configuration after a password change.
The plugin has two goals generate and scramble. The generate goal is interesting, executing this goal compiles
the Kotlin DSL settings and outputs the XML files used by TeamCity into the target/generated-configs directory. If
the DSL files fail to compile or contain an incorrect setting the XML files are not produced and a file
dsl_exception.xml is created listing the problems.
The example below shows what happens if a build type is created without a uuid.
dsl_exception.xml
<?xml version="1.0" encoding="UTF-8"?>
<exception message="DSL script execution failure">
<details>
<info>jetbrains.buildServer.configs.dsl.kotlin.KotlinRunner.run [106]</info>
<info>jetbrains.buildServer.configs.dsl.kotlin.KotlinRunner.run [85]</info>
<info>jetbrains.buildServer.configs.dsl.DslGeneratorProcess.generateProjects [79]</info>
<info>jetbrains.buildServer.configs.dsl.DslGeneratorProcess.main [41]</info>
</details>
<errors>
<error type="validation" source="" message="Missing uuid in buildType 'GradleTeamcityPlugin_BuildJava8'" project="GradleTeamCityPlugin" />
</errors>
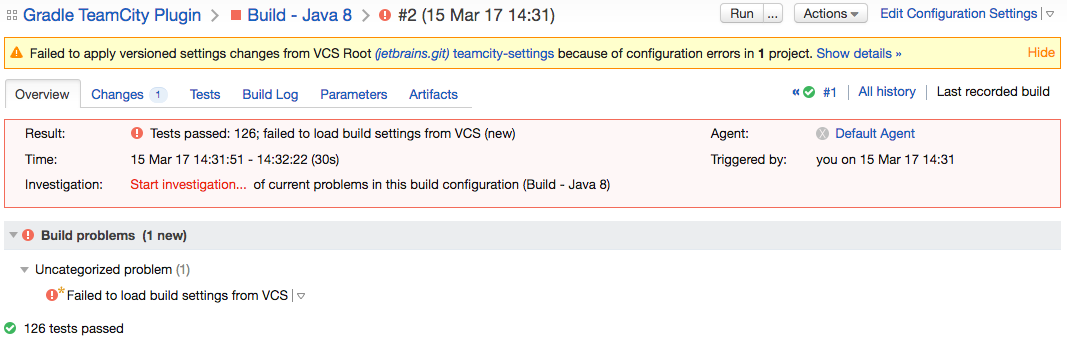
</exception>If the invalid configuration change is committed, TeamCity will show the problem on the project page as shown below.

Running a build with an invalid configuration change will use the previous valid settings but will show that the build has a problem.
The plugin provides a useful tool to check the settings before committing but there are many cases where it doesn’t
report a problem. It is possible to use the same uuid for build configurations, there are no checks for build feature
parameters and it doesn’t catch the import problem I had in the previous post.
Gradle DSL Plugin
The Maven plugin, teamcity-configs-maven-plugin, appears to be a simple adapter that calls into the DSL generator
code that is used by TeamCity.
I decided to try creating a Gradle plugin that does a similar job and the result can be found in this project,
gradle-teamcity-dsl-plugin.
The plugin provides a task generateConfiguration that compiles the settings DSL and outputs the XML files
into the build/generated-configs directory and sets up the .teamcity directory as a source set.
It is still a work-in-progress but is quite usable now as an alternative to the Maven plugin.
Summary
The documentation provides useful setup information but lacks a good DSL reference like the Gradle DSL reference.
Using the DSL to create projects and build configurations is very flexible as shown by the different approaches I took to create multiple build configurations. I’m sure one or more of them could be used to setup multiple projects and possibly hundreds of build configurations.
Due to the lack of a good DSL reference the development cycle for creating and editing settings will require using the TeamCity UI to configure a project or build configuration and to then export it in Kotlin format.
I imagine that creating build configurations targeting different platforms, build tools or version control systems will have some of the same problems I’ve encountered above and possibly others.
A comment in my previous post describes how the code completion menu offers too many options, this was due to
the approach I took of moving all the code into the settings.kts file. I’m guessing most of the DSL API is in scope
making it more difficult to choose a valid, in scope, method or field. I discovered this after introducing the
functions to create a build type and configure it, within the functions there was less API options.
Hopefully this post and the previous post have provided some ideas on how to use TeamCity’s Kotlin DSL.
TeamCity Versioned Settings with Kotlin
17 March 2017
Tags: teamcity configuration kotlin gradle
Introduction
This post is about my experiments using TeamCity’s Kotlin DSL after reading the Kotlin Configuration Scripts series of posts on the TeamCity blog. What I wanted to know, is it possible to start a new server and import versioned settings to setup a project with one or more build configurations. I also wanted to try using Gradle to resolve the Kotlin DSL dependencies. My preferred build tool is Gradle and if I add a TeamCity configuration to a project could it be done without having to add a Maven POM file to the project.
All the code used in this post can be found in the following GitHub repository teamcity-settings under the basic branch.
Project Setup
The initial project setup I used was a Gradle build file using the Gradle TeamCity plugin with an environment configured to use TeamCity 10, this was used for starting and stopping the TeamCity Server and Build Agent.
After starting the server I created a simple project in TeamCity with no VCS root or build configuration, this was to get the minimum amount of code as a starting point. The project settings were downloaded by selecting the Download settings in Kotlin format under the Actions drop down when editing the project.
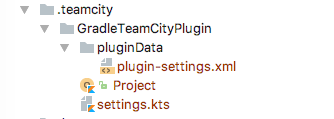
The settings are saved in a file called projectSettings.zip, unpacking this archive gives us the files shown below.
Configuring the Maven Repository and Dependencies
After unpacking the projectSettings.zip file, the Gradle build file needs to be updated with the dependencies that
will be used to provide type checking and code completion when editing the Kotlin DSL files.
The Maven POM file contains 2 repository configurations one for the JetBrains Maven repository and one for the TeamCity
server the settings were downloaded from.
Only the TeamCity server repository is added, the JetBrains Maven repository and MavenCentral are added by
the Gradle TeamCity plugin.
build.gradle
repositories {
    maven {
        url 'http://localhost:8111/app/dsl-plugins-repository'
    }
}
The Maven POM file contains dependencies to the Kotlin standard library kotlin-stdlib, the Kotlin DSL library
configs-dsl-kotlin and to a Kotlin DSL plugins POM file configs-dsl-kotlin-plugins.
The Kotlin DSL plugin POM file contains dependencies to 20 Kotlin DSL plugin dependencies, Gradle doesn’t support
resolving dependencies from a POM type so each dependency was added to the build file. You can see the list of
dependencies here.
Providing the DSL plugins from the TeamCity server means that the server must be started for either Maven or Gradle to
resolve the dependencies. I don’t know why these dependencies are provided by the TeamCity server and not available
from the JetBrains Maven repository but what I have discovered is that the dependencies are generated when the
server is started and removed when the server is shutdown.
They can be found in the TeamCity temp directory in a sub-directory with a name starting with dslPlugins. In that
directory there are sub-directories for each of the configs-dsl-kotlin dependencies and in each directory there
are 2 files generated-dsl.jar and sources.jar.
Configure the main Java Source Set
The next change to enable Gradle to parse the Kotlin DSL code is to apply the java plugin and configure the
main source set to locate the source in the .teamcity directory.
build.gradle
sourceSets {
    main {
        java {
            srcDirs = ['.teamcity']
        }
    }
}
This really just configures my IDE with the configs-dsl-kotlin dependencies in order to parse the code and
provide highlighting and code completion.
Configuring TeamCity
The project contains the minimum amount of code to setup a project in TeamCity and the next step is to import the settings into TeamCity.
To import the settings from the teamcity-settings project I setup a VCS root in the Root project and set the Default branch field to refs/heads/basic.
Using the project I created earlier to generate the initial Kotlin DSL code I selected the Versioned Settings page and selected the option Synchronization enabled with the sub-option use settings from VCS.
Enabling Versioned Settings Synchronization
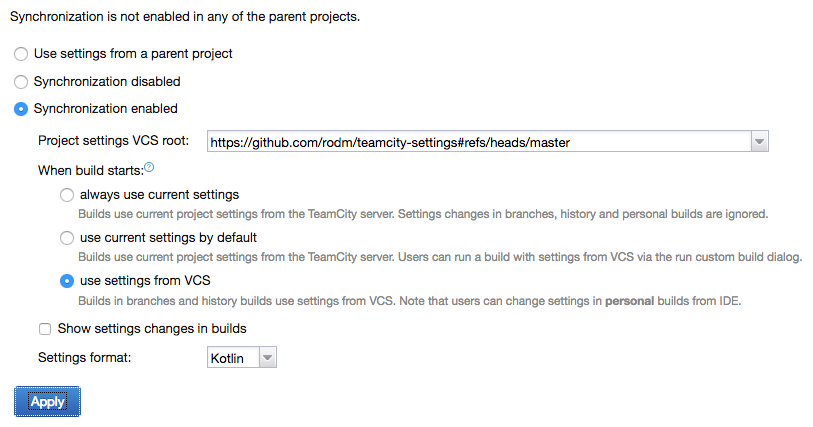
Clicking the Apply button TeamCity shows a warning dialog about scrambled passwords being committed to the version control system, this can be ignored, the project configuration doesn’t contain any passwords. Clicking on the OK button TeamCity then shows the Existing Project Settings Detected dialog.
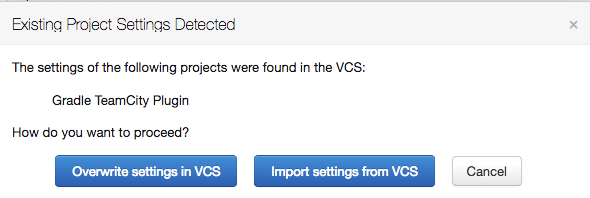
After selecting the Import settings from VCS option TeamCity takes a moment to import the settings and configure the project.
My first attempt resulted in the Versioned Settings being disabled, with the option Use settings from parent project being selected.
Disabled Version Settings
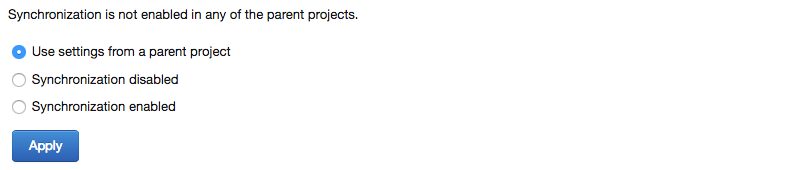
This should be expected, I didn’t provide the versioned settings configuration in the Project.kt file.
After defining a VCS root for the teamcity-settings project and adding a versionedSettings
configuration block, shown below, repeating the steps above resulted in the project being configured to use the version
controlled settings.
Project.kt
    vcsRoot(GitVcsRoot({
        uuid = "723408f3-cc0c-42da-b348-dedd4bc030ef"
        extId = "TeamcitySettings"
        name = "teamcity-settings"
        url = "https://github.com/rodm/teamcity-settings"
        branch = "refs/heads/basic"
    }))

    features {
        versionedSettings {
            id = "PROJECT_EXT_1"
            mode = VersionedSettings.Mode.ENABLED
            buildSettingsMode = VersionedSettings.BuildSettingsMode.PREFER_SETTINGS_FROM_VCS
            rootExtId = "TeamcitySettings"
            showChanges = true
            settingsFormat = VersionedSettings.Format.KOTLIN
        }
    }
Setting up a Build
At this point the TeamCity project is using the configuration defined in the VCS repository, so the next step was to setup a build configuration to checkout and build the Gradle TeamCity plugin project. This project is a Gradle plugin built using the Gradle wrapper, the only requirement is a Java installation.
The following code defines the VCS root to checkout the project, the build step to call Gradle, a configuration
parameter used to define the Gradle tasks to execute and a VCS trigger. By default TeamCity will generate the code
for a build configuration in a separate Kotlin file, I wanted to keep the number of Kotlin files to a minimum so
put the configuration in the Project.kt file.
Project.kt
    val buildType = BuildType({
        uuid = "b9b0cbf7-1665-4fe5-a24d-956280379ef0"
        extId = "GradleTeamcityPlugin_Build"
        name = "Build - Java 7"

        vcs {
            root(vcs)
        }

        steps {
            gradle {
                tasks = "%gradle.tasks%"
                useGradleWrapper = true
                gradleWrapperPath = ""
                enableStacktrace = true
            }
        }

        params {
            param("gradle.tasks", "clean build")
        }

        triggers {
            vcs {
            }
        }
    })
The complete file can be seen here.
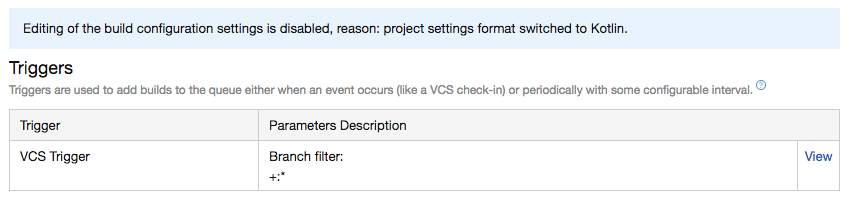
After committing the changes, TeamCity updated the project with the build configuration. However the build configuration was incomplete, the VCS trigger was missing.
Missing VCS Trigger

The problem was a missing import, after adding the following import statement the build configuration was updated and the VCS trigger appeared.
Project.kt
import jetbrains.buildServer.configs.kotlin.v10.triggers.vcsVCS Trigger
Configuration Parameters
One last change I made was to make the version of Java used to run the build configurable by using a
parameter.
The jdkHome property was added to the Gradle build step and the parameter defined in the parameters block.
Project.kt
        steps {
            gradle {
                tasks = "%gradle.tasks%"
                useGradleWrapper = true
                gradleWrapperPath = ""
                enableStacktrace = true
                jdkHome = "%java.home%"
            }
        }

        params {
            param("gradle.tasks", "clean build")
            param("java.home", "%java7.home%")
        }
Setting it to use another parameter java7.home meant that after TeamCity updated the project the build configuration
had no compatible build agents..
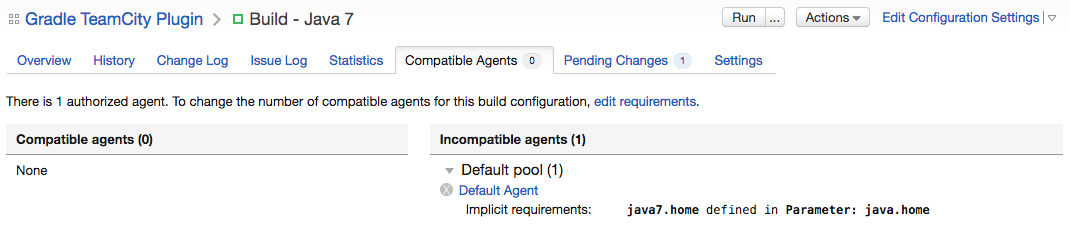
To fix this required editing the buildAgent.properties file and adding the java7.home parameter, after the Build
Agent re-started the build configuration was compatible again.
This highlights that it is useful to have the Show settings changes in builds option in Versioned Settings enabled
and to check the TeamCity server after configuration changes to ensure builds have not been left unable to run.
Conclusion
After experimenting for a few days there were some positives and negatives, here is what I liked about using the Kotlin DSL.
-
A newly setup TeamCity server can be bootstrapped by importing one or more projects with build configurations from settings stored in a VCS repository.
-
Committing configuration changes show in the Change Log for any affected build configuration, useful when a build fails and determining if it is due to a configuration change.
-
Configuration changes are updated automatically by TeamCity.
-
The code for the project and build configuration is easy to read and understand.
-
It is possible to create a Gradle build file to support editing the Kotlin DSL files.
And the negatives:
-
The initial generated code with the project, vcs settings, and build configurations is spread across multiple Kotlin files.
-
The configuration DSL exposes too much of the implementation language, Kotlin, with each configuration type being declared using an object expression, an anonymous class, and each file containing a number of import statements.
-
The reason for using Kotlin for the DSL was to provide static type checking of the configuration but, as shown above with the missing VCS trigger, it doesn’t help if the imports are wrong and Kotlin uses another function.
-
For the IDE or build tool to resolve the
configs-dsl-kotlindependencies requires a running TeamCity server. -
When editing a configuration block I was expecting to see the code completion dialog show fewer functions to make it easier to write, this didn’t appear to happen. For example, code completion shows the subproject function and many others within the steps block.
-
Due to the above much of the example code shown above was created by editing a project using the TeamCity UI then copying and pasting the required parts.
-
Each type in the configuration appears to require a
uuid, aextId, and anameproperty, its not clear what the significance of theuuidis.
Configuring TeamCity using the Kotlin DSL works and is mostly readable but it has a number of problems in the steps
needed to create and maintain the configuration.
I would prefer the configuration to be in a single file, like Travis CI or AppVeyor.
I would also like to see if the number of required properties can be reduced, are uuid and extId needed, or
could they be derived from the name property.
Can the dependencies for the Kotlin DSL plugins be published to the JetBrains Maven repository to avoid having
to start a TeamCity server.
I plan to continue experimenting, to create a project with multiple build configurations, to try build templates
and to try the teamcity-configs Maven plugin.
Installing TeamCity using the war file
28 February 2017
Tags: teamcity installation configuration
Most of this post was written a few years ago, like my previous post, but I never got around to finishing it. So after tidying up some parts and finishing others, here it is.
Introduction
The recommended installer to use for setting up a TeamCity installation is to use the TeamCity distribution bundled with Tomcat. This post is about the setup of TeamCity using the war file that I’ve used since the first version of TeamCity. The setup allows the configuration and supporting scripts to be committed to a version control system and makes it easier to upgrade TeamCity, Tomcat and Java. The war file can be downloaded from the TeamCity download page by selecting the JavaEE option.
The instructions for installing using the war file are here Installing TeamCity into Existing J2EE Container, but I’m going to describe my approach that installs TeamCity on a Linux system.
Directory structure
All the packages are installed into the /opt directory. Oracle’s version of Java is used as OpenJDK is not officially
supported by JetBrains but it may work, it is unpacked into the /opt directory. A directory for the TeamCity
application war file, configuration files, and shell scripts is created, /opt/teamcity-server. Tomcat is unpacked
into the /opt directory and the conf directory is copied to the /opt/teamcity-server directory. A teamcity user
and group are created using the useradd and groupadd commands and the teamcity-server directory has the owner
and group settings changed to use these ids.
The /opt directory looks like the following:
drwxr-xr-x  9 root     root     4096 May 19 22:34 apache-tomcat-7.0.54
drwxr-xr-x  8 uucp          143 4096 Jun 17 04:27 jdk1.7.0_65
drwxr-xr-x 10 teamcity teamcity 4096 Jan 28 18:08 teamcity-server
The contents of the directory, /opt/teamcity-server, after installing and adding scripts is as follows.
drwxr-xr-x 2 teamcity teamcity      4096 Jan 28 18:04 bin
drwxr-xr-x 3 teamcity teamcity      4096 Jan 28 18:04 conf
drwxr-xr-x 6 teamcity teamcity      4096 Jan 28 18:08 data
drwxr-xr-x 2 teamcity teamcity      4096 Jan 28 18:05 logs
drwxrwxr-x 4 teamcity teamcity      4096 Jan 28 18:08 temp
drwxrwxr-x 3 teamcity teamcity      4096 Jan 28 18:04 webapps
drwxrwxr-x 3 teamcity teamcity      4096 Jan 28 18:05 work
-rw-r--r-- 1 teamcity teamcity 434544596 Jan 28 18:04 TeamCity-8.0.6.war
The bin directory contains a script to start and stop TeamCity, server.sh. This script calls the startup.sh and
shutdown.sh scripts in the Tomcat installation directory and sets a number of environment variables and Java
properties to configure TeamCity and the JVM. The Tomcat environment variables TOMCAT_HOME and TOMCAT_BASE are
set to the Tomcat install directory and the TeamCity directory, they are explained in the Tomcat
documentation. The TEAMCITY_DATA_PATH variable is used to set the TeamCity BuildServer directory. An example of
the server.sh can be seen here.
The data directory is the TeamCity .BuildServer directory that is normally created in the home directory of the user
that TeamCity runs under. The default is overridden by the server.sh script to use the data directory in
/opt/teamcity-server. Putting the TeamCity and Tomcat configuration along with the script to start and stop the server
under the /opt/teamcity-server directory allows the configuration to be stored in a version control system. The
following directories are excluded from version control logs, temp, webapp and work.
TeamCity 9 will support storing the configuration in version control but if you’re using an older version it’s
possible using this setup.
The logs, temp and work directories are empty directories and are used by Tomcat.
Tomcat configuration
The file server.xml in the conf directory is modified, the port the server listens on is changed to the
default that TeamCity uses, 8111, the shutdown port is changed to 8115, and the redirectPort is changed to 8113.
On the connector for port 8111, the acceptCount is set to 100, the redirectPort to 8113, the useBodyEncodingForURI is set to true, and maxThreads set to 200. On the connector for port 8113 (changed from 8443), the useBodyEncodingforURI is set to true.
In the conf/Catalina/localhost directory a Tomcat context file is created, teamcity.xml that references the
TeamCity war file.
teamcity.xml
<?xml version="1.0" encoding="UTF-8"?>
<Context docBase="${catalina.base}/TeamCity-8.0.6.war"/>
Database
The TeamCity documentation recommends not using the default HSQLDB database for a production setup. So I used MySQL, it can be installed using the Linux package manager. A database is created for TeamCity to use, using the following SQL. Here’s a link to TeamCity’s documentation on setting up on MySQL.
CREATE DATABASE $TEAMCITY_DB_NAME DEFAULT CHARACTER SET utf8;

CREATE USER '$TEAMCITY_DB_USER'@'%' IDENTIFIED BY '$TEAMCITY_DB_PASS';
GRANT ALL ON $TEAMCITY_DB_NAME.* TO '$TEAMCITY_DB_USER'@'%';

DROP USER ''@'localhost';

DROP USER ''@'teamcity.localdomain';
The above example uses environment variables to set the database name, user and password, an example setup script can be seen here.
Before TeamCity added support for using the JDBC driver placed in the <TeamCity data directory>/lib/jdbc it was
possible to use another directory. Tomcat can be configured to add jars and classes to the classpath by modifying
the catalina.properties file. The MySQL JDBC driver can be put into the directory shared/lib and the property
shared.loader in catalina.properties can be changed to shared/lib. This avoids having to put the driver into the
webapps/ROOT/WEB-INF/lib directory.
Properties
The server.sh script used to start and stop TeamCity sets the following properties
-
java.net.preferIPv4Stack=true - Configures Java to prefer using IPv4 for network connections
-
java.rmi.server.hostname=$HOSTNAME - Allows remote JMX monitoring of the server, this must be the hostname for remote access and not localhost
-
teamcity.data.path=$TEAMCITY_HOME/data - Overrides the default TeamCity data directory
-
teamcity_logs=$TEAMCITY_HOME/logs - Overrides the default directory for TeamCity logs
-
log4j.configuration=file:$TEAMCITY_HOME/conf/teamcity-server-log4j.xml
-
teamcity.diskSpaceWatcher.threshold=250000 - Reports free space on the server’s disk usage
-
teamcity.queue.mergeBuilds=true - Combines builds in the queue
-
modification.check.interval=360 - VCS check period
The environment variable TEAMCITY_HOME is set to the /opt/teamcity-server directory.
The last three properties are TeamCity specific, I don’t remember where they came from, possibly from the support forums, but they are possibly no longer used.
Upgrading
One of the main reasons for this setup was to make it easy to upgrade either Java, Tomcat or TeamCity.
To upgrade Java just requires unpacking a new version in the /opt directory and updating the JAVA_HOME environment
variable in the configuration file, /etc/teamcity-server.conf, that is used by the server.sh script.
Similarly upgrading Tomcat requires unpacking into the /opt directory and updating the CATALINA_HOME environment
variable in the file /etc/teamcity-server.conf. Using the CATALINA_BASE environment variable allows the Tomcat
installation to be separate from the configuration files, conf/catalina.properties and conf/server.xml, used by
the TeamCity webapp.
To upgrade TeamCity, the server is shutdown and the database is backed up. The contents of the logs, temp,
webapps and work directories can be moved or deleted, the conf/Catalina/localhost/teamcity.xml file is updated
to reference the new TeamCity war file, and the server is started.
Summary
The setup allows for easy upgrades of the various components, Java, Tomcat and TeamCity. All scripts and configuration files for Tomcat and TeamCity are under one directory and can be committed to version control. It uses a little less disk space than using the official installer, the default build agent and development package are omitted saving about 35MB. While this isn’t much it does avoid the possibility of starting the default build agent which could then use about 500MB or more of disk space. I think it is recommended to avoid running a build agent on the same machine as the build server.
An example of the setup described above can be found in the setup-server.sh script in the teamcity-vagrant project. It uses Vagrant to setup and start the TeamCity server and up to three Build Agents.
This post doesn’t discuss the setup of TeamCity Build Agents, there is a setup-agent.sh
script in the teamcity-vagrant project that downloads the buildAgent.zip file from the server
and configures the agent. The installation of Build Agents is probably a separate post, I’ve since created Build Agents
using Packer and repackaged the buildAgent.zip as RPM and deb packages for Linux and a
pkg file for Mac, but I think most people will be looking at using Docker for running Build Agents.
Monitoring TeamCity using JMX
17 January 2017
Most of this post was written a few years ago but I never got around to finishing it. So after adding some images showing the MBean attributes as viewed using Java VisualVM and updating the summary, here it is.
Where I used to work we had been using TeamCity for a number of years, and I developed a plugin to expose a number of the server’s metrics via JMX so that we could track what it was doing over time.
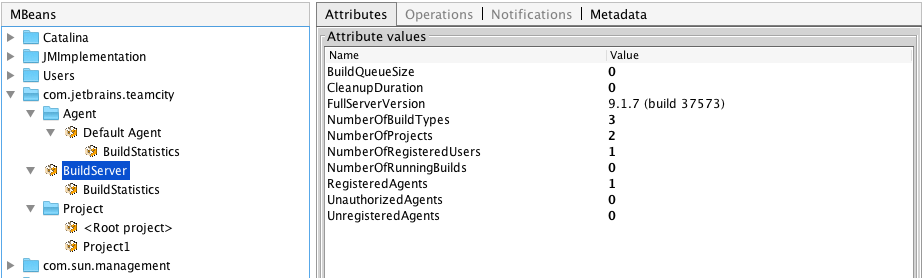
To give an idea of the attributes that can be monitored by the plugin the following images show the MBean attributes for a couple of the objects. The first image shows the Build Server’s MBean attributes. Some of the attributes that will be discussed later in this post are BuildQueueSize, RegisteredAgents, NumberOfRunningBuilds and CleanupDuration
The next image shows the MBean attributes for a Build Agent, specifically the Default Agent. If there were more build agents, each would appear as a separate node under the Agent node.
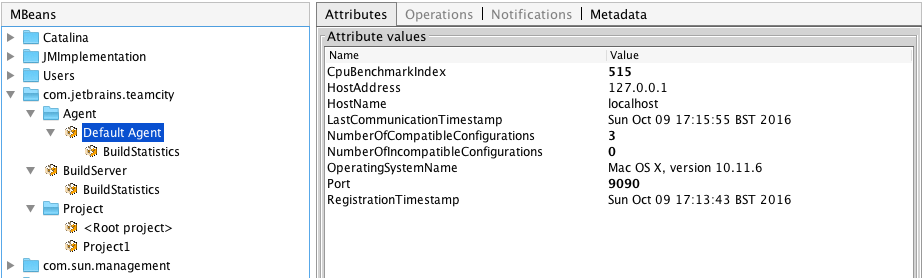
Additionally both have a BuildStatistics node with the following attributes, BuildsStarted, BuildsFinished, BuildsInterrupted, SuccessfulBuilds, FailedBuilds and IgnoredBuilds.
What we started to track was, build agents connected and available to run builds, the number of builds running and the number of builds in the build queue. Another important metric was server availability, TeamCity has a cleanup process that runs each night and during the cleanup it’s unavailable. Having teams around the world means there is only a small window for the clean up to happen, but we didn’t know how long it typically took.
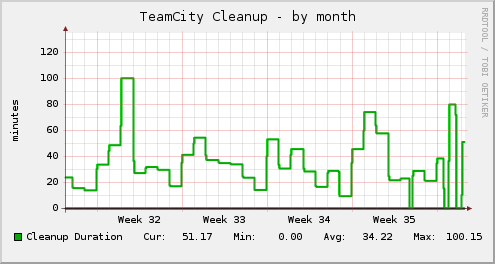
The graph below is from the Munin monitoring tool which was configured to collect build agents available, running builds and build queue size. These are the BuildServer MBean attributes RegisteredAgents, NumberOfRunningBuilds and BuildQueueSize.
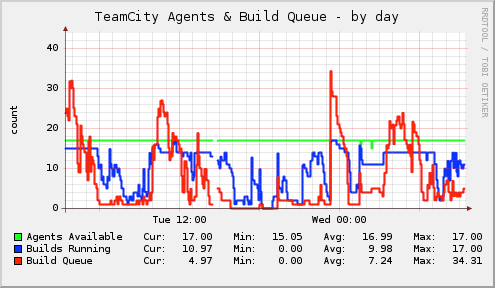
The blue line shows build agents running builds, and it shows that they a kept busy most of the time. The spike in the build queue, the red line, above the 'Wed 00:00' label is when a number of maintenance builds that run on all the agents are scheduled.
Another example shows the build activity for a week, most days are the same, the days labeled '01' and '02' are the weekend.
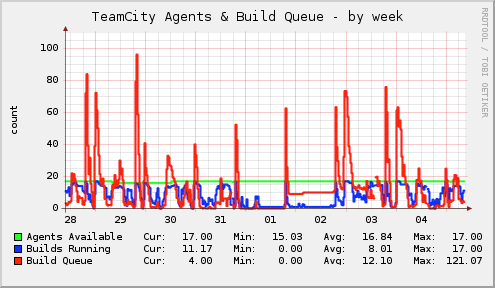
Again the nightly maintenance tasks show up as spikes each day. One interesting problem is for day '02', the build queue has a number of builds, agents are availble but the queue doesn’t decrease. One possible cause of this is a build stuck on an agent and the queued builds are maintenance tasks for that agent. Another is a resource monitor plugin that we use that can prevent builds from running if the resource isn’t available, i.e. a database server.
The next graph shows the cleanup time for a month. It shows a variation in the amount of time that TeamCity is unavailable, some days its only 15-20 minutes others its 90 minutes or more. There a few points on the graph where 0 is recorded, this is due to the server being restarted, the JMX plugin only makes the cleanup time available after a cleanup has occurred.
The time taken is becoming a problem with us having teams around the world using the server, the following issue is to address this and should hopefully make it into version 9, TW-2527: Ability to have TeamCity server online 24/7
Integration to Munin
The JMX plugin only provides the current values when queried, to record the values over time and highlight trends the Munin monitoring tool was configured to collect various values. Munin makes this data available in graphs for the current day, week, month and year.
To integrate with Munin requires a plugin, the jmxquery plugin is available in the Munin plugin GitHub repository under the contrib directory. There are instructions on where to download the plugin and configure Munin in this README file.
Summary
That was just a few examples of how JMX and Munin can be used to monitor a continuous integration server. The graphs produced by Munin allowed normal daily behaviour to be observed and allowed problems to be identified. Using JMX and Munin was useful at the time but there maybe better options now for tracking what your continuous integration server is doing. Newer versions of TeamCity have the 'Usage Statistics' page but it may still be useful to collect values using JMX.
I had the intention of extending the plugin to expose more attributes using JMX but never got around to it. The code for plugin is available on GitHub and the project page has instructions on how to build it or alternatively it can be downloaded from the TeamCity Plugins repository or Bintray
Using the Gradle TeamCity plugin - Part 2
30 December 2016
Tags: gradle teamcity build plugin
This post is the second of two on using the Gradle TeamCity plugin and will cover how to setup multiple TeamCity environments to test and debug a plugin.
First we will look at configuring environments, all the properties and tasks that are available and some tips on setting up a project to develop a TeamCity plugin.
Environments
Environments are configured in the environments configuration block under the teamcity configuration.
The environments configuration allows one or more TeamCity installations to be defined so that
the plugin being developed can be deployed and tested.
Environment properties
An environment is given a name and each environment has the properties shown in the following example:
teamcity {
    environments {
        name {
            version = '9.0'
            downloadUrl = `${baseDownloadUrl}/TeamCity-${version}.tar.gz`
            homeDir = `${baseHomeDir}/TeamCity-${version}`
            dataDir = `${baseDataDir}/${version}`
            javaHome = file('/path/to/java')
            serverOptions = '-Dteamcity.development.mode=true -Dteamcity.development.shadowCopyClasses=true'
            agentOptions = ''
        }
    }
}
The version property is the released version of TeamCity that is used by the environment. The property is used
as part of the URL to download TeamCity and as part of the directory where TeamCity is installed.
The downloadUrl property is the URL of a TeamCity release that is downloaded. The default is to download the
release archives from the JetBrains download site.
The homeDir property is the path to the TeamCity installation.
The dataDir property is the path to the TeamCity Data Directory where the TeamCity
configuration is stored.
The javaHome property is the path to the version of Java to use to run the TeamCity Server and Build Agent. If the
property is not set the version of Java running Gradle is used.
The serverOptions property is a collection of options that are passed to the TeamCity Server at startup.
The agentOptions property is a collection of options that are passed to the TeamCity Build Agent at startup.
The example above shows all the properties with their default values, so the minimum required to create an environment
is a name, and in that case it would use TeamCity version 9.0. The minimum required for an environment using a
different version is to set the version and possibly the javaHome properties.
Example environment using TeamCity 10.0.4 and Java 8
teamcity {
    environments {
        teamcity10 {
            version = '10.0.4'
            javaHome = file('/path/to/java8')
        }
    }
}
Shared environment properties
The downloadUrl, homeDir and dataDir properties for all environments are based on shared environment properties
to allow installations and data directories to share a common parent directory. The shared properties and their
default values are shown in the following example.
teamcity {
    environments {
        downloadsDir = 'downloads'
        baseDownloadUrl = 'http://download.jetbrains.com/teamcity'
        baseDataDir = 'data'
        baseHomeDir = 'servers'
    }
}
The downloadsDir property is the directory used to store the downloaded TeamCity archives. By default this
directory is under the project, but I would recommend changing this to store the files in another directory.
The baseDownloadUrl property is used to create the URL to download the TeamCity archive. The default is to use the
JetBrains download site, but it can be changed to use an alternative server, possibly a local enterprise server that
mirrors the JetBrains site.
The baseHomeDir property is the directory that the TeamCity release for each environment is installed. Instead of
the archive being unpacked to a 'TeamCity' directory the version is appended as shown earlier. I recommend changing
this to use a directory that can be shared by multiple projects.
The baseDataDir property is the base directory used to store all the TeamCity configuration files for each
environment. Each environment’s configuration files are stored in a sub-directory based on the TeamCity version, but
only the major and minor version numbers are used. I recommend keeping this directory within the project, any build
configurations will most likely be setup to test the TeamCity plugin and possibly not useful elsewhere.
Environment tasks
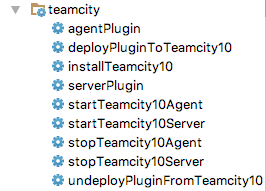
A set of tasks are created for each environment. These tasks support downloading and installing a TeamCity Server, starting and stopping both the server and build agent. There are also tasks to deploy and undeploy the plugin to each environment.
The following lists the task name and description:-
-
downloadName - downloads the TeamCity archive
-
installName - unpacks and installs TeamCity
-
deployPluginToName - deploy plugin to an environment
-
undeployPluginFromName - the plugin from an environment
-
startNameServer - starts the server for an environment
-
stopNameServer - stops the server for an environment
-
startNameAgent - starts the default agent for an environment
-
stopNameAgent - stops the default agent for an environment
The tasks for each environment are grouped by Gradle under 'TeamCity tasks'. The following image shows the tasks for the 'teamcity10' environment in IntelliJ IDEA’s Gradle Tool window.
Examples
The following example shows configuring shared environment properties using Gradle extension properties. The extension
properties are themselves configured using Gradle properties. Gradle properties can be defined in a gradle.properties
file in the project root or in the .gradle directory of the user’s home directory. Additionally Gradle properties
can be set from the command line using the -P option.
The example below shows that the directory to download and store the TeamCity release archives can be overridden with
the Gradle downloads.dir property that is then used to set the shared environments property downloadsDir. Likewise
the servers.dir property is used to set baseHomeDir environments property.
ext {
    downloadsDir = project.findProperty('downloads.dir') ?: "$rootDir/downloads"
    serversDir = project.findProperty('servers.dir') ?: "$rootDir/servers"
    java7Home = project.findProperty('java7.home') ?: '/opt/jdk1.7.0_80'
    java8Home = project.findProperty('java8.home') ?: '/opt/jdk1.8.0_92'
}

teamcity {
    ...

    environments {
        downloadsDir = project.downloadsDir
        baseHomeDir = project.serversDir
        baseDataDir = 'data'

        teamcity9 {
            version = '9.1.7'
            javaHome = file(java7Home)
        }

        teamcity10 {
            version = '10.0.4'
            javaHome = file(java8Home)
        }
    }
}
This next example shows using a Groovy closure to create a string with the Java debug options with a different port for each Java process.
def debugOptions = { port -> "-agentlib:jdwp=transport=dt_socket,server=y,suspend=n,address=${port}" }

teamcity {
    environments {
        teamcity9 {
            version = '9.1.7'
            javaHome = file(java7Home)
            serverOptions debugOptions(5005)
            agentOptions debugOptions(5006)
        }
    }
}
Using environment tasks
In this next section we use the tasks available in each environment to deploy the plugin, start and stop both the TeamCity Server and Build Agent.
Deploying the plugin
The following steps use the agent-server-plugin from the samples directory. The plugin is a simple example of a Build Feature plugin that has both agent-side and server-side components.
If the TeamCity Server for the environment is not already installed the following task can be executed to download and install the TeamCity Server. This task can take several minutes to complete.
$ ./gradlew installTeamcity10
We can now start the TeamCity Server by executing the following task.
$ ./gradlew startTeamcity10Server
The output from the task shows that starting the server will also deploy the plugin.
:build UP-TO-DATE
:deployPluginToTeamcity10
:startTeamcity10Server

BUILD SUCCESSFUL
The first time the server is started some setup is required, accepting the license, selecting the database and creating an administration user.
To see the deployed plugin navigate to the Plugins List in the TeamCity Administration page. The external plugins should show the plugin as shown in the following image

The plugin can be deployed or re-deployed with or with-out the server running by executing the deploy task, as shown.
$ ./gradlew deployPluginToTeamcity10
Finally to start the TeamCity Build Agent the following task can be run.
$ ./gradlew startTeamcity10Agent
After the TeamCity Build Agent has finished its startup procedures it will appear in the Agents list.
Making a change to a web resource and re-deploying the plugin
We can make a change to a web resource file, for example changing the file
src/main/resources/buildServerResources/example.jsp and then re-deploy the plugin without re-starting the server.
$ ./gradlew deployPluginToTeamcity10
...
:check UP-TO-DATE
:build
:deployPluginToTeamcity10

BUILD SUCCESSFUL

Total time: 7.467 secs
Refreshing the example page should show the change.
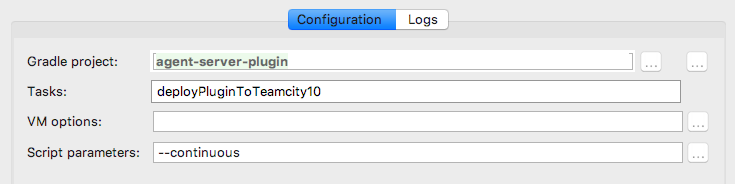
It takes quite a few seconds for Gradle to configure and execute the tasks required to re-package and re-deploy the plugin. Gradle supports a continuous option that keeps Gradle running and monitoring the project for any changes. We can run the deploy task with the continuous option.
$ ./gradlew --continuous deployPluginToTeamcity10
Continuous build is an incubating feature.
...
:build UP-TO-DATE
:deployPluginToTeamcity10 UP-TO-DATE

BUILD SUCCESSFUL

Total time: 6.836 secs

Waiting for changes to input files of tasks... (ctrl-d to exit)
Running the task with the continuous option takes about the same amount of time as the previous deploy but when the resource file is changed again, as shown below, it is much quicker to re-deploy.
Waiting for changes to input files of tasks... (ctrl-d to exit)
modified: .../agent-server-plugin/src/main/resources/buildServerResources/example.jsp
Change detected, executing build...

...
:check UP-TO-DATE
:build
:deployPluginToTeamcity10

BUILD SUCCESSFUL

Total time: 1.648 secs

Waiting for changes to input files of tasks... (ctrl-d to exit)
To run the build continuously from within IDEA requires editing a Run/Debug Configuration and providing the '--continuous' option to a configuration the executes a 'deploy' task, as shown in the following image:
Making a change to a class
We can make a change to a class but there are some restrictions. The TeamCity documentation, Development Environment, covers what can and can’t be done when changing a class. To summarise, using a debug connection, only method bodies can be changed and updated using the JVM’s HotSwap feature.
Debugging the plugin
In this section we will go through the steps to setup both the TeamCity Server and Build Agent in debug mode and connect a remote debugger to them using IntelliJ IDEA.
To debug the TeamCity Server and Build Agent requires enabling the debug options for each Java process. The following example shows and environment with debug options for both the server and agent. Note each uses a different port, this is required if both are to be debugged at the same time.
teamcity {
    environments {
        teamcity10 {
            version = '10.0.4'
            javaHome = file(java8Home)
            serverOptions '-agentlib:jdwp=transport=dt_socket,server=y,suspend=n,address=5005'
            agentOptions '-agentlib:jdwp=transport=dt_socket,server=y,suspend=n,address=5006'
        }
    }
}
Create a Remote Run/Debug Configuration for both the server and the agent, as shown below, the port for each should match the configuration shown above.

We should then have two Remote Debug configurations as shown below.

Start both the server and agent using the Gradle tasks, 'startTeamcity10Server' and 'startTeamcity10Agent', either from the command line or using the Gradle Tool Window in IDEA.
We will need a project and a build configuration to test debugging the plugin. Once the server is started create a project and then a build configuration. The build configuration doesn’t require a VCS root or a build file, a command line build step using an inline script will do.
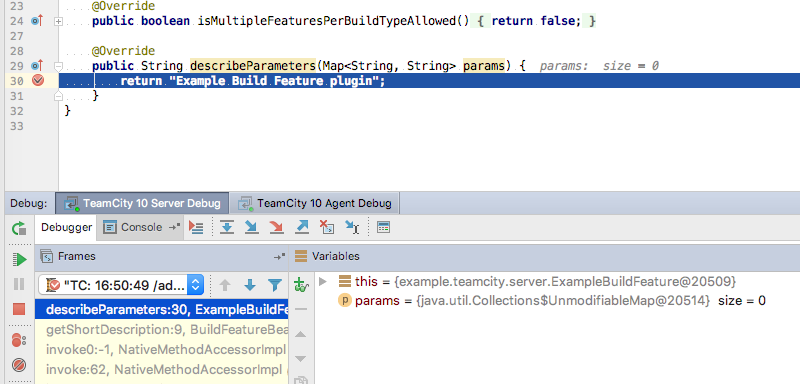
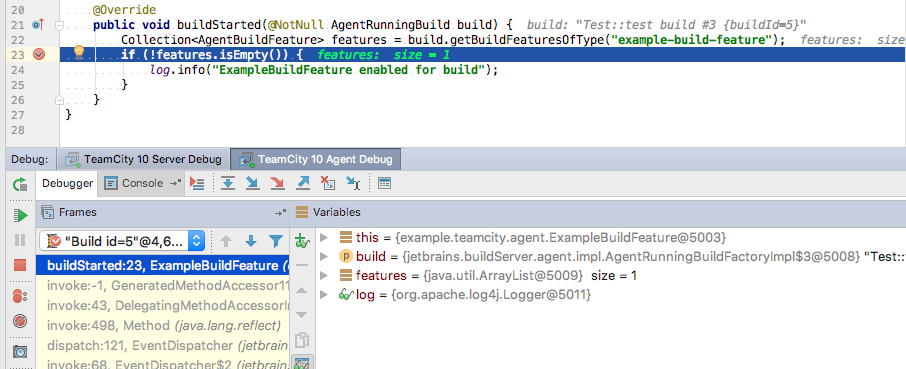
Start the Remote debug connection for the server. Open the 'ExampleBuildFeature' class in the main project and set a breakpoint in the 'describeParameters' method. Using the TeamCity UI edit the build configuration and add the 'Example Build Feature', the remote debug connection should stop at the breakpoint in the plugin source.
The same can be done for agent-side plugin code, start the Remote debug connection for the agent. Open the 'ExampleBuildFeature' class in the agent sub-project and set a breakpoint in the 'buildStarted' method. Run the build configuration, the remote debug connection for the agent should stop at the breakpoint in the agent-side plugin source.
Be aware that the Agent debug connection can become disconnected if the agent preforms an upgrade. This can happen if the agent-side code is changed and the plugin re-deployed.
This post has hopefully provided some help on testing and debugging TeamCity plugins using the Gradle TeamCity plugin.
Using the Gradle TeamCity plugin - Part 1
30 November 2016
Tags: gradle teamcity build plugin
The previous post provided a very brief introduction to using the Gradle TeamCity plugin. This is the first post of two on using the plugin and will expand on the plugin’s configuration properties and tasks, introduce agent-side plugin and tools support and a few tips on using the plugin. The second post will cover how to setup multiple TeamCity environments to test and debug a plugin.
The Gradle TeamCity plugin actually consists of 3 plugins and typically each is applied to a separate Gradle project in a multi-project setup to build and package the corresponding component of a TeamCity plugin.
The server-side plugin, com.github.rodm.teamcity-server adds tasks and dependencies to a Gradle project to build a
server-side plugin archive. This plugin is required to produced the final plugin archive to be deployed to a TeamCity server.
The agent-side plugin, com.github.rodm.teamcity-agent adds tasks and dependencies to a Gradle project to build an
agent-side plugin archive.
The third plugin is the common plugin, com.github.rodm.teamcity-common, this plugin only adds a dependency to a
Gradle project to support creating a shared library for use by both the agent-side and server-side components.
We can configure the version of the API to be used by the plugins by setting the version property in the teamcity
configuration. By default it’s set to '9.0', it can be set to any release or snapshot version of TeamCity but I
would recommend setting the version using only the major and minor numbers.
teamcity {
    version = '9.1'
}
We can support changing the version at build time by using a Gradle property. Using a Gradle property to change the API version to build against makes it easy to discover any incompatible API changes.
ext {
    teamcityVersion = findProperty('teamcity.version') ?: '9.1'
}
With the above configuration, building the plugin against a newer version of the API can be run by providing an
override to the teamcity.version property at the command line.
$ ./gradlew -Pteamcity.version=10.0 clean build
Common plugin
The first plugin of the three is the common plugin. This plugin only adds the common-api dependency to a Gradle
project. The output of the project, a jar file, can then be packaged with both the agent-side and server-side plugins.
apply plugin: 'java'
apply plugin: 'com.github.rodm.teamcity-common'

teamcity {
    version = teamcityVersion
}
The example above shows the version property being set with the value of the extension property teamcityVersion,
this expects the extension property value to be inherited from the root project.
By default the jar file will contain the project version as part of its name. For a jar file that will be packaged
into a plugin archive file it may not be necessary to keep the version, we can remove the version from the jar name
by setting the version property of the jar task to an empty string.
jar {
    version = ''
}
Agent plugin
The next plugin is the agent-side plugin, it adds the dependency agent-api to a project and the following
tasks:-
-
generateAgentDescriptor -
processAgentDescriptor -
agentPlugin
The generateAgentDescriptor task will use the descriptor defined in the Gradle build file and generate an agent-side
plugin descriptor file in the build directory. The task is disabled if the descriptor is defined to use an external
file.
The processAgentDescriptor task will use the descriptor file defined in the Gradle build file. It will copy the
descriptor file to the build directory and replace any token in the file with the value defined in the build file.
The agentPlugin task packages the agent-side jar, any third-party libraries and plugin descriptor into an agent-side
plugin archive, a zip file. The agent-side plugin archive is added to the plugin configuration so that it can be
used as a dependency by a project building the server-side plugin.
In addition to adding the above tasks the plugin extends the jar task to output warnings if the Spring Bean
descriptor file references any classes that are not included in the agent-side jar file.
The example below shows the minimum configuration required to create an agent-side plugin descriptor. More descriptor properties supported by the plugin can be found in the examples of the README file.
teamcity {
    agent {
        descriptor {
            pluginDeployment {
                useSeparateClassloader = true
            }
        }
    }
}
We can include a shared jar built against the common-api from another Gradle project by adding it as a dependency.
dependencies {
    compile project(':common')
}
By default the agent-side plugin archive name is a based on the name of the root Gradle project with '-agent' and
the project version appended. We can change this by setting the baseName and version properties of the agentPlugin
task.
agentPlugin {
    baseName = 'pluginName'
    version = ''
}
We can include additional jars, native libraries and scripts in the plugin archive. The files to be included can be
defined in one or more files CopySpec configuration blocks.
teamcity {
    agent {
        files {
            into('lib') {
                from('path/to/additional/jars')
            }
        }
        files {
            into('bin') {
                from('path/to/scripts')
            }
        }
    }
}
A Tool plugin
The agent-side plugin can also produce a tool plugin. A tool plugin can be used to repackage an existing tool for deployment to TeamCity. The tool is made available to build configurations as a parameter, the parameter is the path to where the tool is installed on each build agent.
A minimal Gradle project to build a tool plugin can apply the agent-side and server-side plugins and use Gradle’s dependency management to download the tool to be repackaged.
The samples directory for the Gradle TeamCity plugin contains an example project,
agent-tool-plugin, that shows Apache Maven 3.3.3 being repackaged as a tool. The build file
shows how the Maven archive is downloaded as a dependency, added to the plugin archive using the files
CopySpec and how the mvn shell script is set to be executable.
Creating tool plugins is useful for deploying tools to all TeamCity build agents that are not available using the native package manager on the build agent host.
Server plugin
The final plugin is the server-side plugin, it adds the dependency server-api to the project and the following
tasks:-
-
generateServerDescriptor -
processServerDescriptor -
serverPlugin
The generateServerDescriptor task will use the descriptor defined in the Gradle build file and generate an server-side
plugin descriptor file in the build directory. The task is disabled if the descriptor is defined to use an external
file.
The processServerDescriptor task will use the descriptor file defined in the Gradle build file. It will copy the
descriptor file to the build directory and replace any token in the file with the value defined in the build file.
An example is shown at the end of this post.
The serverPlugin task packages the server-side jar, any third-party libraries, the agent-side plugin archive and
plugin descriptor into a server-side plugin archive, a zip file.
A complete set of the descriptor properties supported by the server-side plugin can be found in the examples of the README file.
The server-side plugin, like the agent-side plugin, extends the jar to output warnings if the Spring Bean descriptor
file references classes that are not included in the server-side jar file.
To include a jar from another project that has been built against the common-api the same configuration
shown above for the agent-side plugin can be used.
To include the agent-side plugin archive, the output from a project building the agent-side plugin, can be added to
the agent configuration as shown below.
dependencies {
    agent project(path: ':agent', configuration: 'plugin')
}
The server-side plugin like the agent-side plugin can include additional files, jars or native libs, and scripts in
the archive using the files CopySpec property. The example shown for the agent-side is the
same for the server-side.
The default name for the plugin archive is the name of the root Gradle project, this is typically defined in the
settings.gradle file, and the version property. We can change the name and remove the version from the archive name
by setting the following properties on the serverPlugin task.
serverPlugin {
    baseName = 'pluginName'
    version = ''
}
Tokens to be replaced in the plugin descriptor XML file should follow Ant’s style for tokens, this means they should start and end with the '@' character.
<?xml version="1.0" encoding="UTF-8"?>
<teamcity-plugin xmlns:xsi="http://www.w3.org/2001/XMLSchema-instance"
                 xsi:noNamespaceSchemaLocation="urn:schemas-jetbrains-com:teamcity-plugin-v1-xml">
    <info>
        <name>server-plugin</name>
        <display-name>server-plugin</display-name>
        <version>@VERSION@</version>
        <description>TeamCity Example Server Plugin</description>
        <vendor>
            <name>@VENDOR_NAME@</name>
        </vendor>
    </info>
    <deployment use-separate-classloader="true"/>
</teamcity-plugin>
To replace the tokens in the above file the server-side plugin can be configured, as shown below, to provide a map of the tokens and values.
teamcity {
    server {
        descriptor = file("${rootDir}/teamcity-plugin.xml")
        tokens VERSION: project.version, VENDOR_NAME: 'vendor'
    }
}
This post has hopefully provided more detail and some tips on building TeamCity plugins using the Gradle TeamCity plugin. The next post will show how to use the plugin to test and debug a TeamCity plugin.
TeamCity Plugin Development with Gradle
28 October 2016
This post follows the steps in Getting Started with Plugin Development but uses Gradle as the build tool with the Gradle TeamCity plugin.
Step 1 - Set up the environment
To develop a plugin for TeamCity, first set up a plugin development environment.
-
Download and install Oracle Java. Java 1.8 is required for TeamCity 10.
-
Download and install a Java IDE that has Gradle integration
-
Download and install Gradle. Follow the Gradle installation instructions.
A TeamCity installation is not needed at this point and will be downloaded and installed later using a task provided by the Gradle TeamCity plugin.
Step 2 - Generate a Gradle project
Unlike Maven, Gradle doesn’t have archetype support so the initial project structure will be created using Gradle’s init task and the plugin files will be manually created.
Create a directory called demoPlugin, change into the directory and execute the following command to create a Gradle project
$GRADLE_HOME/bin/gradle init
Note: On Windows use the gradle.bat command
View the project structure
After the command finishes the directory contains the following files:
-
the
build.gradlefile containing a commented-out sample Java project -
the
settings.gradlefile -
the
gradlewfile to run Gradle on Linux and OS X -
the
gradlew.batfile to run Gradle on Windows -
the
gradledirectory contains the Gradle wrapper used to run Gradle
Open the project in an IDE
Edit the build.gradle file and replace the contents with the following
plugins {
  id 'java'
  id 'com.github.rodm.teamcity-server' version '0.9.1'
}

group = 'com.demoDomain.teamcity.demoPlugin'
version = '1.0-SNAPSHOT'

teamcity {
    version = '10.0'
}
The contents of the settings.gradle file should set the project name as shown
rootProject.name = 'demoPlugin'Step 3 - Edit the plugin descriptor
The Gradle plugin supports defining the plugin descriptor in a separate file or in the build file. For this example
the descriptor will be defined in the build.gradle file. Add the following 'server' configuration block containing
the plugin descriptor to the build file.
teamcity {
    version = '10.0'

    server {
        descriptor {
            name = project.name
            displayName = 'Demo Plugin'
            version = project.version
            vendorName = 'Demo Vendor'
            description = 'Demo plugin description'
            useSeparateClassloader = false
        }
    }
}
Using the inline descriptor allows the descriptor to use property values generated during the build such as a version number or a build timestamp.
Step 4 - Create the plugin sources
Create the following directories for the Java source and plugin resources
-
src/main/java -
src/main/resources/META-INF -
src/main/resources/buildServerResources
A. Create the plugin web-resources
In the buildServerResources directory create the Hello.jsp file. Enter the contents as shown in the
TeamCity documentation
B. Create the controller and obtain the path to the JSP
In the src/main/java directory create the sub-directories com/demoDomain/teamcity/demoPlugin then create the
AppServer.java file. Enter the contents as shown in the
TeamCity documentation
C. Update the Spring bean definition
In the src/main/resources/META-INF directory create the file build-server-plugin-demo-plugin.xml and enter the
contents as shown in the
TeamCity documentation
Step 5 - Build the plugin with Gradle
At the root of the project execute the following command
./gradlew build
The build/distributions directory will contain the demoPlugin-1.0-SNAPSHOT.zip file.
Step 6 - Install the plugin to TeamCity
To install and start a TeamCity instance edit the build.gradle file adding an 'environments' configuration block
as shown.
teamcity {
    server {
        descriptor {
            ...
        }

        environments {
            teamcity10 {
                version = '10.0.2'
            }
        }
    }
}
Run ./gradlew tasks to see the new tasks available to download and install TeamCity, tasks to start and stop the
server and agent, and tasks to deploy and undeploy the plugin.
To download and install TeamCity for the environment, execute the following command, note this will take some time.
./gradlew installTeamcity10
To deploy the plugin and start the server execute the following command
./gradlew startTeamcity10Server
The first time the TeamCity Server is started a database connection must be selected, the license agreement accepted and an administrator account setup. Select 'Internal HSQLDB' for the database type.
The TeamCity Demo Plugin should appear in Administration|Plugins List.
The Hello World page is available via http://localhost:8111/demoPlugin.html.
Completed examples of the build files can be downloaded from the following links build.gradle and settings.gradle
Older posts are available in the archive.